I think this is the fourth big overhaul of benjaminandrew.net, which doesn't seem like all that many, but I honestly might be forgetting one.
The site has been on Wordpress for the last couple versions, with the most redesign in 2017. That version of the site had some fun features, like the following giant page headers with animating SVG icons. I also used CSS Grid, back when it was brand new, for a particularly loose and asymmetrical homepage — something I've tried to stick to in the new design.
The old site eschewed a top navigation menu on the homepage, which I thought would be cool and provocative, but wound up regretting because the big clickable banners on the homepage did not signify their clickable potential clearly. Some other dated design choices and a desire to adopt the increasingly popular tool of static site generators finally pushed me to start the design, or rather complete rebuild since I was moving from Wordpress to Eleventy.
I'm no Javascript master, so Eleventy appealed to me because it can be so rudimentary in dealing with content as simple Markdown and HTML. I was also smitten with the tool's scrappy DIY attitude and its popularity among respected developers. The other big selling points of publishing with Jamstack tools, is that you get faster sites that don't burn as much energy, and you don't need to pay for expensive shared hosting or (shudder) open an FTP client. Netlify wound up being my choice of hosting tool, with easy form handling and a reliable free tier. All you need is a GitHub repo to point it at, and your site is online for free (not including a custom domain).
So I used a Node script called Wordpress Export to Markdown to convert my posts and pages into Markdown files, and got to work looking through the many great Eleventy starter projects.
I hybridized parts of Keerthi Yendamuri's Filter Coffee starter and Tom Reinert's 11ty Tailwind starter into my own ☁️ Cloudy Night starter site 🌙, which you can remix into your own site!
Besides combining some bits from those other starter sites, mine includes the basis of an opinonated design system and a cool hacky way of running images through Cloudinary for responsive and blazing fast images (more on that in a bit).
I'll explain some of the features of my Eleventy build, but for a comprehensive beginner's guide to Eleventy, I recommend this one by Tatiana Mac.
Theming and Dark Mode
This site has a dark mode, which is a feature I've been more aware of since our latest child has left me reading in the dark a lot in the middle of the night... I mostly followed this tutorial by Ryan Feigenbaum, but any approach basically has you creating two sets of variables that get used depending on an attribute applied to the <html> or <body> element.
I defined a single color palette in SASS, so I could use lighten and darken operations on my primary theme colors, and then placed those into CSS custom properties for the light and dark themes. You run into a lot of semantic choices with this, and I liked the approach of using "surface" and "element" for naming the custom properties to allow the names to gel with a variety of contexts. Otherwise if you set your text color to "dark" it won't make sense when the color theme gets inverted.
$paper: #FDF6EB;
$light: #fffdf9;
$dark: #2D272C;
$gray: #dbd6d2;
$light-gray: #E5E5E5;
$dark-gray: #a29b9b;
$extra-dark-gray: #575353;
$primary: #B4422B;
$primary-light: lighten($primary, 20%);
$primary-dark: darken($primary, 5%);

:root[color-mode="light"] {
  --surface: #{ $paper };
  --surface-emphasis: #{ $light };
  --element: #{ $dark };
  --element-subtle: #{ $gray };

  --primary: #{ $primary };
  --primary-soft: #{ $primary-light };
  --primary-emphasis: #{ $primary-dark };
}

:root[color-mode="dark"] {
  --surface: #{ $dark };
  --surface-emphasis: #{ $extra-dark-gray };
  --element: #{ $paper };
  --element-subtle: #{ $extra-dark-gray };

  --primary: #{ darken($primary, 5%) };
  --primary-soft: #{ $primary-dark };
  --primary-emphasis: #{ $primary-light };

}
For typography, I kept Kanit bold and Overpass (sans and monospace) which I spent a lot of time choosing and am still enamored by. I used a ratio to scale the sitewide font-sizes proportionally, and also used SASS variables for generic size units that are useful for margin, padding, and so on. I kept having to add more of these unit, and made it up to "xxxl", which seems bad somehow but ¯\_(ツ)_/¯. I like to use SASS for variables that aren't going to be changed dynamically on the client side simply because they're faster to type.
// TYPE SCALE
$ratio: 1.25;  // Major third
$base-font-size: 18px;
$h6-size: $base-font-size;
$h5-size: $base-font-size * $ratio;
$h4-size: $h5-size * $ratio;
$h3-size: $h4-size * $ratio;
$h2-size: $h3-size * $ratio;
$h1-size: $h2-size * $ratio;
$jumbo-size: $h1-size * $ratio;

// LAYOUT
$unit-xsml: 0.25rem;
$unit-sml: .5rem;
$unit-med: 1rem;
$unit-lrg: 3rem;
$unit-xl: 6rem;
$unit-xxl: 9rem;
$unit-xxxl: 18rem;
Eleventy and Post Types
In Eleventy, you can automatically generate collections of pages if they have the same tag in the frontmatter ( some metadata placed at the top of a Markdown file). Coming from Wordpress, it feels weird to use "tags" in the same way as a custom post type, as opposed to, you know... tags. One of my favorite things in Wordpress is creating custom fields to really flesh out and customize metadata for posts. This is still possible in Eleventy as you can see from the frontmatter included on one of my "projects":
layout: layouts/project.njk
title: Our Datastream
description:  An illustrated guide to data economies and emerging cooperatives.
date: 2021-07-01
location: State College
featured_image: /2021/ds_coffee.jpg
featured_alt: Printed lists and framed objects on a wall with red string.
featured_project: true
tags:
    - projects
project_type:
    - art
media:
    - web
    - installation
That data gets plugged into page templates built on the Nunjucks templating language, which is so close to plain HTML that it makes life easy. You can even include "if" statements to check if the data exists in a given project's frontmatter.
  <ul class="project-meta">
        <li>{{ post.data.project_type }}</li>
        {% if post.data.location %}
          <li>{{ post.data.location }}, </li>
        {% endif %}
  </ul>
Looping through a collection is easy, such as here where I display projects in reverse-chron order, and use a Nunjucks template for each one to get displayed as a card in the timeline. collections.projects grabs any page with the projects tag.
{% set postslist = collections.projects | reverse %}
  {%- for post in postslist -%}
       {% include "partials/project-card.njk" %}
  {%- endfor -%}
PRO TIP: The code above was initially processed as an actual Nunjucks loop despite being in a codeblock! Meaning that it grabbed all those posts and displayed the code from the relevant template — YOWZA! To escape Nunjucks templating in your Markdown, use these totally sweet tags: ` Your code .
Cloudinary and Images
There are so many approaches to images these days, such as Eleventy's own image plugin, but I like that Cloudinary handles a lot of the behavior for you. The Cloudinary Eleventy Helpers plugin by Jason Lengstorf does something similar, but I had already set mine up by the time I saw his. 😓
My Cloudinary shortcode uses the fetch command, to inject a Cloudinary URL into any image path in the site. The following function is added to eleventy.js:
// Image shortcode
  config.addShortcode('img', function (path, alt, aspect) {

    // If the shortcode defines aspect as 'p' » set ratio="portrait", otherwise it's "landscape"
      var ratio = (aspect =="p") ? "portrait":"landscape";

      // Only run in production mode
      if (process.env.NODE_ENV === 'production') {
      return `<img src="https://res.cloudinary.com/YOUR_USER_NAME/image/fetch/q_auto,f_auto/https://YOUR_URL/images/${path}" alt="${alt}" class="${ ratio }">`
      }

      // Local dev
      else {
      return `<img src="/images/${path}" alt="${alt}" class="${ ratio }">`
      }
  })
When writing a post in Markdown, images can be added individually or within a special gallery element.
// Single image
<img src="https://res.cloudinary.com/benjand/image/fetch/q_auto,f_auto/https://benjaminandrew.net/images/2021/filename.jpg" alt="Alt text" class="landscape">

// Gallery
<div class="gallery">
  <img src="https://res.cloudinary.com/benjand/image/fetch/q_auto,f_auto/https://benjaminandrew.net/images/2021/filename.jpg" alt="Alt text" class="portrait">
  <img src="https://res.cloudinary.com/benjand/image/fetch/q_auto,f_auto/https://benjaminandrew.net/images/2021/filename.jpg" alt="Alt text" class="landscape">
  <img src="https://res.cloudinary.com/benjand/image/fetch/q_auto,f_auto/https://benjaminandrew.net/images/2021/filename.jpg" alt="Alt text" class="landscape">
</div>
I wanted the shortcode to be as concise as possible, so the only thing in there besides the filepath and alt text is an optional declaration of the image's aspect ratio. A lot of my Project pages include little grids of images, and by default all images receive a class of "landscape", but if you type that 'p' in there, the Javascript code above will label it with a class of "portrait" which affects it's display in the CSS grid.
Other Tidbits
The 'Generate new bio" button on the homepage was inspired by similar interactive bios from Jason Lengstorf, and Cassidy Williams.
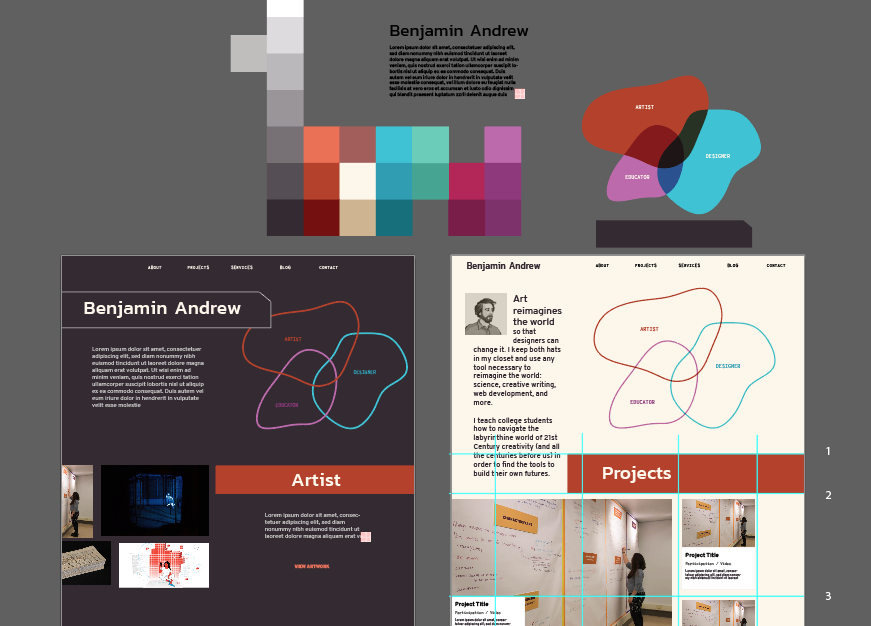
One of my key design goals was to combine my art and design projects into a single timeline. This reflects the overlaps of my personal art and design practices, as well as the blend of those disciplines that I teach in my classes. This is also the impetus for the animated blobs on the homepage. Some while back, I saw a personal site that included a massive timeline of projects and life events, and thought that including that kind of stuff was a great idea. I don't remember who that was though — sorry!
The filters on the timeline are built using Isotope, which I used in my previous Wordpress site, but for this version I adapted the code to Vanilla JS to avoid including Jquery. There are still some bugs I'm working out here, as the code is surprisingly complex and there aren't a lot of Vanilla JS examples online. 🤫
Syntax highlighting for code snippets is handled by Highlight JS.